Sunday, November 29, 2020

Nailtopia Blue-tiful Daze Holiday Kit

Hey everyone! Hope you had a safe and nice Thanksgiving. We stayed home and had a little Thanksgiving for the two of us. I made a mini charcuterie board for lunch (yum!) and then for dinner we had sweet potato casserole, cornbread stuffing, and chicken marsala since we don't like turkey. I've definitely enjoyed having the four day weekend to recover from a super busy couple weeks at work.

Today I'm sharing with you a cute little holiday nail polish kit from Nailtopia, which would make a great gift this season. There are two kits available in red and blue, and you can find them both at Ulta for $14.99 ($25 value!) I received the Blue-tiful Daze Holiday Kit from Nailtopia Beauty as a member of their Nailtopia Maven Program.


The Blue-tiful Daze Holiday Kit includes three 0.17 oz mini nail polishes:
  • Hula Girl - sky blue creme
  • Blue-tiful Daze - blue and silver glitter
  • Ride the Wave - royal blue shimmer

The kit itself is encased in a BIODEGRADABLE, reusable bag made 100% from recycled materials! Perfect for storing lip balm, gloss, concealer, and other little items for on the go. The new white caps on the bottle are also recyclable. These polishes are 100% vegan, cruelty free, non-toxic, and all free.

Another really cool thing I want to note is that Blue-tiful Daze is the first ever biodegradable, bio-sourced glitter, which is derived from cotton. These glitter particles dissipate naturally back into nature to reduce waste, whereas most nail lacquer glitters contain tiny bits of plastic that never fully break down. This glitter also requires NO extra soaking to remove!

All three polishes were easy to apply - even the glitter was opaque in two coats! It's nice to see a company come out with a nail polish set that those of us who celebrate Hanukkah can use :)


Hope you have a great week!

xoxo,

   Brooke

Monday, November 2, 2020

Nailtopia Smokey Road Glow

Hey everyone! Hope you had a fun and safe Halloween weekend. We're not really into Halloween, but we grabbed some BOGO candy at CVS and then watched the most recent Purge movie (pretty good!)

Today I'm sharing a Nailtopia duo called Smokey Road Glow. I received this product from Nailtopia Beauty as a member of their Nailtopia Maven Program. This duo retails for $10 and you can find it at Ulta or on Nailtopia's website.

Smokey Road Glow is a "2 Bottles, 3 Looks" kit, which means you can create 3 looks with the two polishes. Smokey Road is a beautiful grayish purple creme and Hampton Glow is a sparkly champagne - I used two coats of each. When you apply Hampton Glow on top of Smokey Road, it creates this gorgeous sparkly silvery purple color. I think the combo of both is my favorite, but the colors each look nice on their own!


Have a great week and stay safe!

xoxo,

   Brooke

Monday, October 5, 2020

Nailtopia Blank Slate

Hey everyone! Hope you had a nice weekend. We really enjoyed the cooler weather, and I’m getting excited for fall.

I have the perfect nail color to share for the transition into this season! I recently received the color Blank Slate from Nailtopia Beauty as a member of their Nailtopia Maven program. This color is described as a blue-toned grey creme, but I really feel it’s a true grey. The self-leveling formula was very easy to work with, and I really liked the brush. I'm definitely looking forward to trying more colors from this brand.


Have a great week!

xoxo,
   Brooke

Monday, August 31, 2020

Negative Space Chevron Nails

Hey everyone! How was your weekend? 

I've been wanting to try some negative space nail art, so to make it easy I used some single chevron nail vinyls. Mine are pretty old, but here's a link to similar vinyls.

I started with my clear base coat, and once that dried I firmly pressed the vinyls onto the lower half of my nails. I used two Olive & June colors from their summer collection for this look. I have a blog post with swatches of the whole collection, and I do think a lot of the colors go nicely together for a design like this.

On the bottom half, I used two coats of Fierce & Loving, described as a fresh lilac. On the top half I used three coats of Honest & True, a pale blue creme. I gave my nails a couple minutes to dry and then carefully peeled the vinyls off, leaving behind the negative space in between the two colors. After a couple more minutes I applied the Olive & June top coat.  I love how these came out! I'd really like to try this look with a curved vinyl as well. What colors would you pick?


Have a greet week!

xoxo,
   Brooke

Monday, August 24, 2020

Nailtopia Nails are Nourished Kit Review

Hey everyone! How was your weekend? We had a ton of laundry and clean up to do around the apartment, so that took up most of our Saturday. We needed Sunday just to relax. The weekend ended way too fast!

Today I'm sharing a review of the Nailtopia Nails are Nourished Kit. I was gifted these products from Nailtopia Beauty as a part of their Nailtopia Maven Group. The kit retails for $10, and you can purchase it from Ulta.

I had only recently heard of Nailtopia Beauty, but I was really excited to partner with them after learning more about their products. Nailtopia's sustainable formulations are made with bio-sourced, plant based fruit & vegetables. Their biotechnology is a greener process that considerably reduces environmental footprint. 

The Nails are Nourished Kit includes:
  • Raspberry Nail Nourishment (0.17 oz) to restore & rejuvenate nails.
  • Raspberry Cuticle Hydration (0.17 oz) to replenish and re-hydrate cuticles.

Raspberry provides alpha-linolenic and Vitamin E to help nails and cuticles become hydrated and promotes regeneration of cells. Plant-based AHA/PHA helps to absorb the vitamins and strengthens, hardens, and conditions nails and cuticles.


The claims:
Nails are nourished after 2 weeks
Nails are improved after 2 weeks
Cuticles are softened after 2 weeks
Cuticles improved quality after 2 weeks

How to use:
1. Apply 2 coats of the Raspberry Nail Nourishment to bare nails. Let dry.
2. Apply 1 coat of the Raspberry Cuticle Hydration to cuticles. Massage in to achieve a better absorption.


My final thoughts:
I have to mention the scent of these products. They both have a very natural and pleasant raspberry scent upon application, which was such a welcome change from the usual chemical scent of nail products. The scent doesn't linger, which I also appreciate.

I had the Raspberry Nail Nourishment on for a week and have noticed that my nails, which are very prone to peeling, have been peeling less. Last night I removed it and re-applied, so we'll see if the improvement continues during week two. I'll also note that this product gives a really nice, healthy shine to the nails.

As for the Raspberry Cuticle Hydration, I love that it's applied with a brush to make for a less messy experience. I didn't find it to be greasy, and it dried fairly quickly. My cuticles have been noticeably more hydrated, something I'm desperately needing with all of the hand washing.

Overall, I'm really happy to have these non-toxic products that I feel good about using. I will definitely be putting together an order soon from Ulta to try some of their polishes!

Have a great week!

xoxo,
   Brooke

Monday, August 10, 2020

Essie Pastel Smoosh Nails

Hey everyone! So sorry for the long absence, I'm still trying to figure out how to work painting my nails into my new routine. A lot of the time I have been painting them - I just don't have the opportunity to take photos and share! If you follow me on IG, @manicurediaryblog, I tend to post there if I don't have the time for a full blog post.

I felt like doing smoosh nails again, but with a pastel twist. I grabbed a few of my favorite Essie shades: Baguette Me Not, Go Ginza, Bikini So Teeny, Blossom Dandy, and Hay There. 

I used one coat of Baguette Me Not as a base for each nail. The rest is super easy to do if you have a nail stamping tool and some sort of surface you can place drops of polish on. I actually have a nail stamping mat that I love, but you could easily use a piece of wax paper, saran wrap, or foil. I put a couple of drops of each color in one spot and then press the stamper down a few times, then gently press the design over my nail. Repeat for each finger, clean up any excess on your nails, add a top coat, and you're done! Sometimes I even like to jazz up my smoosh nails with some glitter or nail foil. 


Hope you have a great week!

xoxo,   

   Brooke

Monday, July 20, 2020

ILNP Pink Ombre

Hey everyone! How was your weekend? It was so HOT here! We tried to get outside a little but got sweaty immediately, which was gross, so most of the time we enjoyed our AC in the apartment.

Today I'm sharing a quick pink ombre look using three gorgeous holos from ILNP. I love using holos to create ombre looks because they're so forgiving and easy to use. I didn't even bother sponging these on! I just applied the three colors with the polish brush and went back to overlap them a little to create that more seamless ombre look. 

First, I started with ILNP Paige at the bottom of the nail. Paige is described as a berry pink holo and it's one of my favorite ILNP polishes of all time. The bottle is actually about half empty, which never happens with my polishes! I then went slightly over that and further up with ILNP Citrus Punch, an orange coral holo with a gorgeous golden shift. This one is new to my collection and I think I love it just as much as Paige! The last color I used was Pink Mimosa, a beautiful rosy pink holo. Once I had one coat of each I went back and repeated the process. Easy, right?


Hope you have a great week!

xoxo,
   Brooke

Sunday, July 12, 2020

Olive & June x Zeba Summer Collection

Hey everyone! Hope you had a good weekend. We braved IKEA Saturday morning because the cabinet that I store my nail polish in broke, so I wanted to replace it. After some online searching I found one from IKEA that I liked. We were able to get in and out of the store pretty quickly and it's now assembled and all of my polish and makeup has a nice new home.

I finally have all of those nail polishes from the Olive & June x Zeba summer collection swatched and ready to share. It took forever to get this done because I had a whole issue with my order and then on top of that I work full time, so it's challenging to figure out when to paint my nails. But it's finally done and I'm so excited to show you all of these fun colors!


Let me tell you about what happened with my order. I've been following Olive & June for a while but none of their colors really interested me until the summer collection was announced. It looked unique with bright, fun colors and the special ombre box was super cute. I purchased the "Into You Box," which comes in a limited edition ombre box with an ombre pouch and includes the following products:
  • 7 new summer shades (each polish individually costs $8)
  • Limited edition Poppy polish bottle handle in purple
  • The Top Coat
  • Cuticle Serum with Cactus Flower
  • Clean-Up Brush
  • Polish Remover Pot
  • Flat-Edge Clippers
  • Dual-Grit File
  • Nail Buffer Bar
When my order arrived, I was disappointed to see that everything was their usual packaging colors and not the ombre like I ordered. The pouch and the Poppy inside were also not the limited colors. The polishes were supposed to have a special sticker on the top, and only one of the bottle caps had it. This was such a disappointing first impression to the brand, so I reached out to their customer service. To their credit, they were extremely responsive and shipped out another box right away, though I would have been perfectly happy just to get the items that were missing. A week later my new box came and the SAME thing happened AGAIN. I couldn't believe it! I reached out to customer service again and this time the person I spoke with personally checked in with the warehouse to make sure my order would be correct when they shipped it out a THIRD time. Another week went by and when the third box arrived everything was correct. There were no special stickers on the bottles, which still bugged me but I was just happy to have the other items. 

Now that we have the backstory, let's move on and get to the swatches. These are all creme formulas and I generally needed 3 coats for full opacity, but I was able to get away with 2 coats for a couple of them. I also want to note that if you're a fan of a wide brush, then you will love the brushes on Olive & June polishes. I used the Poppy as well and could see someone who is new to painting their nails at home really enjoying it.

The first color I swatched from the collection was Sweet & Gracious, described as an energized orange. I used 3 coats here with their top coat. I LOVE this color. It's totally unique to my collection and super fun for summer.


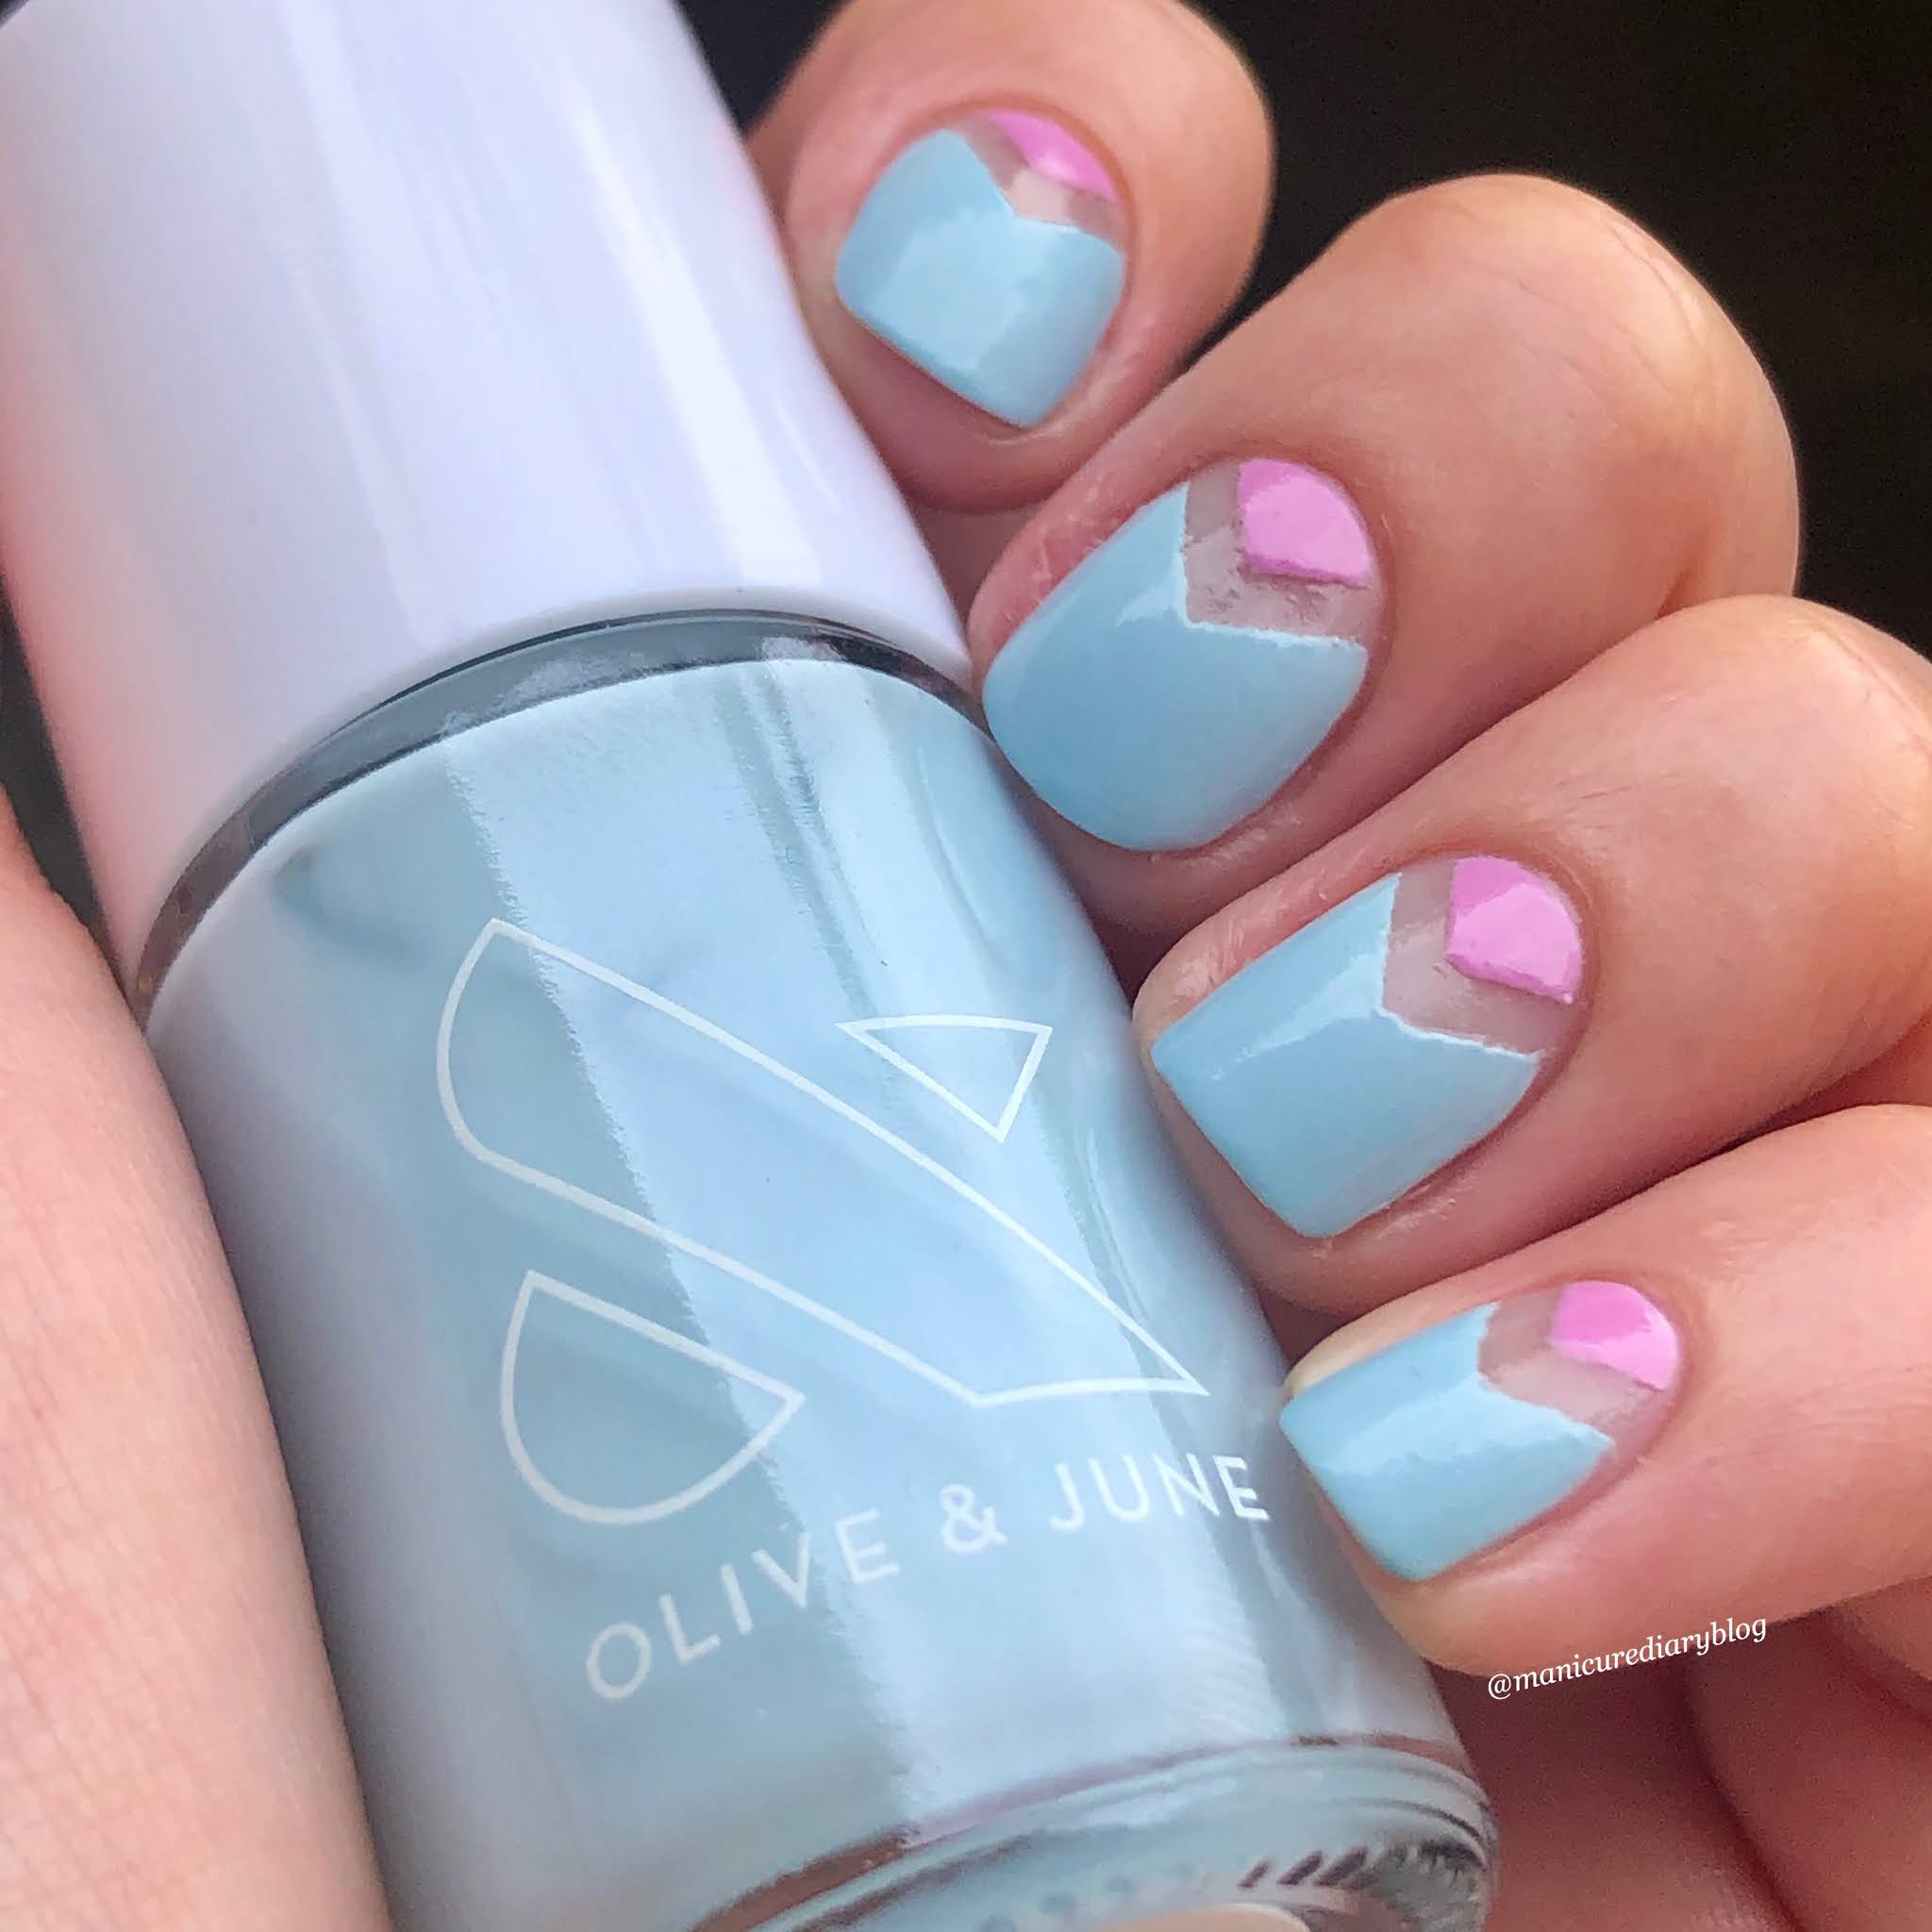
Next we have Honest & True, described as a serene blue that's calm and centering. This is 3 coats with their top coat. I love this shade of blue for summer.


Bold & Unshaken, described as a bold purple, is another favorite from this collection. I used 3 coats with their top coat. It's a true purple that is bright and gorgeous.


Next we have Grateful & Kind, a true bright pink. I used 2 coats with their top coat. I love pink polish, and this is definitely a new favorite.


Fierce & Loving is described as a fresh lilac. I used two coats and their top coat. I absolutely love this color as well and I think it would be perfect during spring!


The next color is Wild & Free, described as a fierce coral. I used 3 coats and their top coat. I was the least excited about this color when I placed my order and I still feel just meh about it after swatching it. I wouldn't really agree with describing this shade of coral as "fierce," though it is pretty.


The last color in the collection is Bright & Focused, described as a beaming yellow. I used 3 coats and their top coat. I'm very picky about my yellow polishes and this one passes the test for sure. It's a very flattering shade of yellow that isn't too neon but also isn't really pastel. It's right in the middle. 


Let's talk about how these wore, since I had each polish on for a few days with a base coat and Olive & June's top coat. I had no issues with chipping at all, even for those that required 3 coats. The true test was how the polish held up after building that IKEA cabinet because I was wearing Bright & Focused at the time. It didn't chip at all! I was very pleasantly surprised and feel confident that I could wear any of these colors on a trip and not worry about my nail polish chipping.

Despite the issues I had with my order, I think I would give Olive & June another chance based on the great quality of the polishes. The stand out colors for me are Sweet & Gracious and Bold & Unshaken, but I do think they did a great job with the colors for this summer collection and as far as formula goes I'd recommend them all. Which color is your favorite?

Have a great week!

xoxo,
   Brooke

Monday, June 15, 2020

Essie Flying Solo

Hey everyone! Hope you had a good weekend. The weather here was absolutely beautiful so we spent plenty of time outside enjoying it. We also made our own pizza on Sunday using DeLallo's pizza kit and pizza sauce and it came out amazing! Definitely recommend if you ever want to make pizza t home.

Before I get into today's nails, I just wanted to update you on my Olive & June order. I received it last week and unfortunately some of the items were incorrect, so I wanted to hold off on my swatches and review. I reached out to their customer service and they reshipped my order, which I really appreciated. It should be here today and I'm hoping to get a review up next weekend.

Moving on, today I have two more colors from Essie's Flying Solo collection. The color on my index and ring finger nails is the namesake of the collection, flying solo. It's a mid-tone, creamy pink creme that applied perfectly in two coats. I have this one on my toes as well! The color on my ring and pinky nails is one way for one, a blue based pink polish with gold frosted pearl and again I used two coats. The formula of this one reminded me of you do blue, which I shared last week.


Have a great week and stay safe!

xoxo,
   Brooke

Monday, June 8, 2020

Essie you do blue

Hey everyone! How was your weekend? The weather was beautiful so we made sure to get outside and take advantage of it.

Since I'm finally getting paychecks again (yay!) I'm catching up on a few nail polishes I've been wanting to add to my collection. I have the Olive & June x Zeba summer collection coming tomorrow so I'll probably do a swatch post for that. Today I'm trying out one of the three colors I purchased from Essie's Flying Solo collection. Can I just first say how much I LOVE the wider brushes Essie uses now? They seem to fit my nail shape perfectly and it makes polishing go super quick.

Anyway, the color I'm wearing today is you do blue, a periwinkle blue with violet iridescence. This is one of those color shifts that's more obvious in the bottle, but still looks lovely on the nails. The formula was great and I needed two coats for full opacity.


Hope you have a great week and stay safe!

xoxo,
   Brooke

Monday, May 25, 2020

Purple Smoosh Nails

Hey everyone! Sorry for the long absence, but I have exciting news! I've been searching for a new job for the past year after leaving teaching and last week I accepted an offer to work on the development team at a local food bank. I went in last week to pick up my computer then I started on-boarding remotely. It was a crazy week meeting everyone via video conferencing and getting familiar with the role, but it was all very exciting!

I finally had some time to paint my nails this weekend, so I did some fun nail art too. I started with two coats of Zoya Abby, a beautiful pale purple creme. I then dotted a few other colors on my stamping mat and pressed a nail stamper into the colors to mix them together. This is where the "smoosh" part comes in. I pressed the stamper a few times on the nail to create swirls of color. I also added some gold foil to make it extra pretty!


Have a great week and stay safe!

xoxo,
   Brooke

Friday, May 8, 2020

Twinkled T Holo Lightning

Hey everyone! Hope you had a good week.

I recently ordered the Nailify Mani Box ($32) from Twinkled T, a small business owned by two sisters and located in LA selling nail polish, nail tools, and nail art supplies. Each box comes with nail nippers, a 10 pack of wood sticks, and a rose gold brush to clean up the cuticles. You then get to choose from several nail polish colors or a holo top coat, a glass nail file, and a sticker sheet. I ended up choosing the Holo Lightning top coat, sprinkle file, and star sticker sheet. They're also selling a Nailify Stamping Box ($32), which comes with liquid latex, a mini holo stamper and scraper, and your choice of stamping plate and 2 stamping polishes.

I was very excited to try the Holo Lightning top coat and decided to apply it over Smith & Cult Suburban Warrior, a hot pink creme. Holo Lightning is filled with different sizes of holographic flakies, ranging from large pieces to tiny flecks. They add so much gorgeous dimension to your nails and I bet this top coat would look awesome on top of other holos. My absolute favorite thing about it is that the flakies are smooth on the nail and don't have any texture.


Have a good weekend and stay safe!

xoxo,
   Brooke

Monday, May 4, 2020

Milk Bath Nails

Hey everyone! Hope you had a good weekend and had a chance to get outside to enjoy the warm weather. We took a long walk each day and it was so nice just to be out in the sun.

I was scrolling through Instagram the other day (like how I do every day haha) and came across something called milk bath nails. This nail art trend is meant to look like a beauty treatment called a milk bath, which is a mixture of milk and water with colorful flowers suspended throughout. To recreate this on the nails, you'll want a milky, sheer nail color and some dried flowers. My flowers from Born Pretty Store are no longer available, but here's a link to something similar.

Generally I've seen these done with acrylic nails and I'm sure you'll get a nice smooth finish over the flowers this way. Since I've done mine on my natural nails with regular polish, my flowers feel a little textured on top. I don't mind this, but just something to think about before you get started.

I thought OPI Bubble Bath would be the perfect color for this look, and I ended up using 3 thin coats to get my desired opacity. Once this was dry I used my top coat as a sort of glue with the flowers and placed the different colors throughout each nail. I also added a bit of gold foil just for an extra pretty touch. Top coat sealed all of the flowers in and they've stayed on really well. These nails came out gorgeous and I would absolutely wear this look again!


Hope you have a good week and stay safe!

xoxo,
   Brooke